In the video we explain step by step how you can work in Hinterland Container Notification (HCN) Rail. Below the video, the topics and the steps to follow are written out for reference.
Also available in Dutch or German.
Navigating to the service
You start HCN Rail as follows:
- Go to iamconnected.eu
- In the top right of the screen, click Log in and follow the steps to sign in
- Within the Port Community System (PCS), under Rail, choose the service Hinterland Container Notification (Rail)
No access yet?
Then follow this guide to create a new account. Ask the Portbase main administrator of your organisation to grant you access to the service by adding your account to the correct user group. Here it is explained which steps the main administrator needs to go through for this.
The Rotations and Handlings dashboard
The Rotations dashboard
Here you have real-time insight into your rotation with the terminal visits requested for it. On the dashboard, the rotation are shown in the following categories:
- Expected: all planned, future rotation.
- In Operation: all rotation currently in progress.
- Completed: all completed rotation.
- Cancelled: all cancelled rotation.
The Handlings dashboard
This dashboard provides insight into the cargo on your trains in the form of pre-notifications and status requests. As on the Rotations dashboard, different categories are used:
- Detached: all status requests. These are containers for which only the container status has been requested and which have not yet been linked to a train. As a result, these containers are not visible on the Rotations dashboard. The pre-notifications you have cancelled also fall into this category.
- Expected: all containers that have been pre-notified on all planned, future rotation.
- In operation: all containers that have been pre-notified on rotation that are currently in progress.
- Completed: all containers that have been pre-notified on rotation that have now been completed.
Creating a new rotation and terminal visit
Creating a new rotation
- In the rotation dashboard, in the top right of the screen, go to the + New rotation button.
- Fill in the required fields.
- Click the Save rotation button to create the rotation definitively.
Creating a new terminal visit
- Open an existing rotation and click + Add visit.
- Fill in the required fields.
- Choose one of the following options:
- Save visit: save the terminal visit without sending the request to the terminal immediately.
- Save & send visit: save the terminal visit and send it to the terminal immediately.
- Cancel visit: if necessary, you can also cancel your terminal visit.
Do you want to add multiple terminal visits to the same rotation? Then repeat the steps above.
Does the same terminal occur two or more times in your circulation?
You can report this circulation as one rotation. Using the example below, we explain which steps you need to go through for this:
- AB/12-BA/34 ECT Delta Friday
- AB/12-BA/34 EMX Saturday
- AB/12-BA/34 APMT2 Saturday
- AB/12-BA/34 RWG Saturday
- AB/56-BA/56 ECT Delta Sunday
Follow the steps below:
- Create a rotation in Portbase with loading number AB/12 and discharge number BA/34.
- Create the visits in the usual way.
- At the second visit to the same terminal (in this case, the ECT Delta scheduled on Sunday), you indicate that this visit has a different loading/discharge number. Do this already when creating the visit. Enter the different loading number AB/56 and discharge number BA/56 in the fields shown below.
- Add the pre-notifications to the visits.
- The pre-notifications are sent to the terminal with the correct loading/discharge number.
If you change the loading/discharge number (both at visit and rotation level) after a pre-notification has already been made, we will send no new COPINO. The CODECOs that return on the previously provided journey number will then also not be matched.
Where can I find my rotation, terminal visit or container details?
Rotation details
Follow these steps to get insight into your rotation:
- Open your rotation. You will now see the rotation including the associated terminal visits.
- Open the rotation.
- Choose one of the tabs for additional information:
- Voyage details: shows the details of the rotation
- Cargo declarants: shows the main rail operator and any additional rail operators
- History: shows all actions performed on the rotation
Terminal visit details
Follow these steps to get insight into your terminal visit:
- Open your rotation and select the desired terminal visit.
- Choose one of the tabs for additional information:
- Visit details: shows the details of the terminal visit
- Handlings: shows all status requests and pre-notified containers. Here you can also add new status requests or pre-notifications.
- Train composition: shows the Train composition in case it has been submitted by the rail operator. You can also upload (an update of) the Train composition here.
- History: shows all actions performed on the terminal visit.
Container details
Follow these steps to get insight into your container:
- Open your rotation and select the desired terminal visit.
- Go to the Handlings tab, where you will find all status requests and pre-notified containers.
- Open a status request or pre-notified container and choose a tab for additional information:
- Handling Details: shows the details of the container.
- History: shows all actions performed on the container.
How do you recognise an update from the terminal on a visit?
A blue dot indicates that the terminal has implemented a change.
If the blue dot is next to a rotation, this means that a change has been made in (one of) the visits within that rotation.
If the blue dot is next to a visit, then there is a change in that specific visit. Open the terminal visit and view the change in the highlighted fields.
An example of such a change is acceptance of the visit by the terminal.
The blue dot disappears for all users as soon as the Acknowledge update button is used. When all changed visits have been accepted, the blue dot next to the rotation also disappears automatically.
Creating pre-notifications and status requests
You can enter containers in HCN Rail in different ways. The three options are explained below.
1. Via the Handlings dashboard
- Go to the Handlings tab.
- Click Add handling in the top right.
- Under Link to existing visit, choose whether you want to link the container to an existing terminal visit.
- Yes: enter the call ID of the planned terminal visit. The visit details are filled in automatically. In the Pre-notification field, you can select whether you want to submit the container as a pre-notification or as a status request.
- No: enter the visit details yourself. If you choose not to link the container to a planned visit, you can only submit your container as a status request.
- Fill in the other required fields.
- Click Submit status request / Submit pre-notification to send the status request / pre-notification to the terminal.
You can find status requests on the Handlings dashboard in the Detached category. You can find pre-notifications in the Expected category.
2. Via the Rotations dashboard
- Go to the Rotations tab.
- Select the desired rotation.
- Select the desired visit.
- Go to the Handlings tab.
- Click Add handling.
- Under Pre-notification, choose whether you want to submit the container as a pre-notification or a status request.
- Fill in the other required fields.
- Click Submit status request / Submit pre-notification to send the status request / pre-notification to the terminal.
You can find all submitted status requests and pre-notifications on the Handlings tab of the visit. The status requests are grouped at the top and the pre-notifications below.
3. Via an Excel upload
With an Excel upload, you can submit multiple containers at once as a status request and/or pre-notification.
- On both the Handlings and Rotations tabs, under the Add handling button you can click Download XLS template. See the steps above for how to get to the Add handling button in the Handlings / Rotations dashboard.
- On the Handlings tab, you can only submit the containers as status requests.
- On the Rotations tab, you can submit the containers both as status requests and as pre-notifications.
- Open the Excel file and read the instructions on the Guide tab.
- Enter the required data on the Pickup and/or Delivery tabs.
- Save the file.
- In HCN Rail, click Upload Handlings (next to the Add handling button in both the Handlings and Rotations dashboard).
- Are you uploading via the Rotations tab? Then choose whether you want to submit the containers as status requests or pre-notifications.
- Select the saved Excel file.
Train composition functionality
The Train composition functionality makes it possible to share the planned inbound and outbound Train composition for all terminal visits on your rotation. The planned inbound and outbound Train composition shows the entire composition of the train, including the discharge and loading containers and the remain-on-train containers.
With the Train composition functionality, you can share the complete planned Train composition for all terminal visits in your rotation, including discharge, loading and remain-on-train containers.
Sharing the planned inbound and planned outbound Train composition with the terminal
Step 1: designate traction supplier on rotation
You must designate the traction supplier on each rotation in HCN Rail, otherwise the traction supplier will not be able to download the realised Train composition after completion of the operation by the terminal. You can designate the traction supplier for both a new and an existing rotation or rotation template, in the Traction supplier field. See below.
Assign traction supplier on new/existing rotation
Assign traction supplier on new/existing rotation template
Step 2: download the Excel template
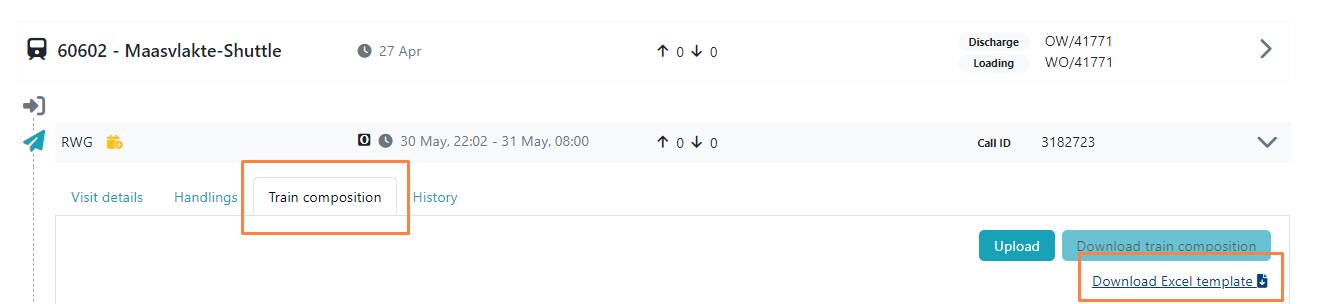
Download the Excel template for sharing the planned inbound and outbound Train composition with the terminal. Go to the Rotations tab, open the rotation and the visit, click the Train Composition tab and then click Download Excel template.
 Step 3: enter the required data
Save the Excel template and fill in the required fields. Consult the Guide tab in the Excel template for an explanation of the requested data for the inbound/outbound Train composition. Which fields you need to fill in per container depends on whether the container is/has been loaded or discharged at a terminal that is/is not connected to HCN Rail.
Please note that you must fill in both the inbound and outbound Train composition. For this, you only need to enter the wagon position, wagon number and wagon slot once. To see the outbound train, you need to scroll to the right in the Excel template.
The container is/has been loaded/discharged at a terminal that is connected to HCN Rail
If there is a container on the planned inbound/outbound Train composition that is/has been loaded/discharged at a terminal that is connected to HCN Rail, some of the required data can be retrieved based on the Handling Id or the container number. It is important that all pre-notifications for the entire rotation have already been made.
- The Handling Id is a unique number to identify a pre-notification and can be found by navigating on the rotation and the visit to the Handlings tab and opening the History tab within the handling. You must enter the Handling Id in column D of the Excel template for the planned inbound Train composition and in column S for the planned outbound Train composition.
- Using the container number is also possible. You must enter the container number in column G of the Excel template for the planned inbound Train composition and in column V for the planned outbound Train composition. It is not possible to load containers on reference using the container number; use the Handling Id for this.
Please note that in addition to the Handling Id/container number, you must also enter the following data:
- wagon position
- wagon number
- wagon slot
- loading terminal
- discharge terminal.
In the Excel template, the grey shaded section contains an example of a container for which some of the required data is retrieved based on the Handling Id. The grey shaded fields are examples and cannot be overwritten.
Are you retrieving the container data based on the Handling Id/container number? Then you must fill in the Cargo weight (kg) and Tare weight (kg) fields as mandatory in the pre-notification of the relevant handling. These are mandatory data on the Train composition.
Are you transporting dangerous goods in the container? Then you are also required to fill in the UN number, the Hazard class and the GEVI in the pre-notification. To do this, click + Add Good in the pre-notification. Three fields will then appear where you can provide this data.
It is possible to send container remarks in the pre-notification; these will then be copied to the Train composition. To date, these container remarks are only processed on the Train composition by ECT. If you want to pass on a container remark to another terminal on the Train composition, we recommend contacting that terminal separately.
The container is/has been loaded/discharged at a terminal that is not connected to HCN Rail
If there is a container on the planned inbound/outbound Train composition that is/has been loaded/discharged at a terminal that is not connected to HCN Rail, you must enter all required data yourself.
UN number, Hazard class, GEVI, limited quantity, packing group, and description only need to be filled in if dangerous goods are being transported in the container.
In the Excel template, the grey shaded section contains several examples of containers for which the required data has been completed fully manually. The grey shaded fields are examples and cannot be overwritten.
It is possible to enter container remarks in the Excel template. To date, these are only processed by ECT. If you want to pass on a container remark to another terminal, we recommend contacting that terminal separately.
Step 4: upload the completed Excel template in the HCN Rail web screens
When you have finished completing the Excel template, save it and upload it in the HCN Rail web screens. The upload button is only available if the terminal operation has not yet started. After uploading the Excel template, the Train composition appears in the web screen. To update the Train composition, the Excel template must be uploaded again with the adjusted data. It is not possible to update the Train composition in the web screen.
Adding an additional rail operator
It is possible to add one or more rail operators to your rotation as additional rail operator(s). This rail operator can, as an additional rail operator, independently submit pre-notifications to the terminals for the visits of your rotation. The additional rail operator will then be charged for the submitted pre-notifications. There are two ways to add an additional rail operator to a rotation.
Option 1: Add an additional rail operator to a specific rotation
- Select the rotation to which you want to add an additional rail operator.
- Go to the Cargo declarants tab.
- Click the Add declarant button to add an additional rail operator. Please note: the additional rail operator must be connected to HCN Rail.
- Click Save declarants.
Option 2: Permanently add an additional rail operator to a recurring rotation
- Select the Configuration tab and then open the saved templates by clicking Rail rotation templates.
- Select the template to which you want to add the additional rail operator.
- Go to the Cargo declarants tab.
- Click the Add declarant button to add an additional rail operator. Please note: the additional rail operator must be connected to HCN Rail.
- Save the changes by clicking Save template at the bottom of the page. Each time you create a new rotation based on this template, the additional rail operator is added automatically. After adding the additional rail operator, the rotation is also shown on the Rotations tab in the web screens of the additional rail operator and/or in the TMS of the additional rail operator via the API system interface. On this rotation, the additional rail operator can now independently add handlings. The additional rail operator only has insight into their own handlings and into the container statuses of their own handlings. This means that the additional rail operator can only edit their own handlings.
To delete the additional rail operator again as the main operator, the additional rail operator must first delete all handlings created.
Linking, unlinking, and moving handlings (containers) on a train visit.
Via the dashboards Handlings and Rotations, you can unlink, link and move the container to another Call id.
Linking and moving
- Select the container
- Click Attach container
- Enter the desired Call id of the train visit
- Click Attach
- You will find the container under the train visit in both the Rotations and Handlings dashboards
Unlinking
- Select the container
- Click Detach container to unlink from the Call-ID
- You will find the container in the Handlings overview under Detached Handlings
ETA Train functionality
The ETA Train functionality is split into two parts:
- Insight into the location of the train in the hinterland.
- Insight into the train’s arrival and departure times and the progress of the operation at the deep-sea terminals in the Port of Rotterdam.
ETA Train in the hinterland
When you open a rotation, the deep-sea terminals appear for which the inland operator has made a terminal visit appointment via HCN Rail.
To retrieve the location of the train in the hinterland, it is necessary within the rotation to share the incoming and/or outgoing train number and the first departure date and/or outgoing first departure date. You can provide these details when creating a new rotation, or add them later to, or change them on, an existing rotation. If you use rail rotation templates, make sure the information is also corrected or supplemented there if required. If these details are not provided correctly, no match can be made with the train location data from the hinterland supplied by an external party. Also note that you assign a traction supplier to the rotation. This gives the traction supplier insight into the rotation and the associated data, enabling them to update the expected and actual arrival and departure times.
From the moment the details have been entered correctly, the ETA Train data is retrieved for the remaining timetable points the train will pass on its way to the Port of Rotterdam and/or from the Port of Rotterdam back into the hinterland. These points, and therefore also the data for each point, only become visible once they have been passed by the train. These are, by default, the departure point in the hinterland, the Dutch border crossing, Barendrecht Vork, and the freight yards at the terminals.
The ETA Train data cannot be retrieved retroactively. This means that if, for example, the details are only provided correctly from Barendrecht Vork onwards, the ETA Train information for the departure point in the hinterland and the Dutch border crossing can no longer be retrieved for the incoming train.
Once the train has passed a timetable point, the timetable point becomes visible in the rotation overview and the actual time at which the train passed the point is shown, as well as (in yellow) any delay. This delay is based on the difference between the actual time the train passed the timetable point and the planned time as known in ProRail’s planning.
ETA Train in the Port of Rotterdam
This part of the functionality shows, per pre-notified visit, the arrival and departure times and the progress of the operation, and therefore includes the fields below. All these fields can be found on the terminal visit in HCN Rail and are visible to all parties involved in the visit.
-
Estimated time of arrival (ETA)
- Rail operator: provides the ETA when creating a visit. When using timetable slots, the slot start time is automatically adopted as the ETA.
- Terminal & traction supplier: can update the ETA.
- Under the ETA, you can expand History to see which party provided which ETA.
-
Arrival/departure delay reason
- Traction supplier: can provide the reason for a train delay.
- This enables the terminal and the rail operator to better assess the expected duration and impact of the delay.
-
Actual time of arrival (ATA)
- Rail operator & terminal & traction supplier: can provide the ATA and update previously shared ATAs (by others).
-
Planned start of operations
- Terminal: can provide and update the expected moment of the loading/discharge of the first container until the first CODECO is received.
-
Actual start of operations
- The actual start of operations is filled automatically when the first discharge/load CODECO for the visit is received in HCN Rail. Once the actual start of operations is known, the planned start of operations is overwritten.
-
Planned finish of operations
- Terminal: can provide and update the expected moment of the loading/discharge of the last container until the last CODECO is received.
-
Actual finish of operations
- The actual finish of operations is filled automatically when the last discharge/load CODECO for the visit is received in HCN Rail. Once the actual finish of operations is known, the planned finish of operations is overwritten.
-
Estimated time of departure (ETD)
- Rail operator: provides the ETD when creating a visit. When using timetable slots, the slot end time is automatically adopted as the ETD.
- Terminal & traction supplier: can update the ETD.
- Under the ETD, you can expand History to see which party provided which ETD.
-
Actual time of departure (ATD)
- Rail operator & terminal & traction supplier: can provide the ATD and update previously shared ATDs (by others).
Shipments
Watch the video below for more information about shipments.
Also available in Dutch.
With the Shipments function, you have insight into which containers have been assigned to you through nomination. You can also nominate another inland operator for the pre-notification and collection of the container. This is a new way of working to share data securely with each other, also known as the Secure Chain .
Components
From the HCN Rail service, go to the Shipments tab.
Here you will see an overview of all containers for which you have been nominated via the Secure Chain and for which further action may be required.
Under the Arrivals tab, you will find the containers displayed per seagoing vessel. Under the Shipments tab, the containers are grouped per principal or cargo director.
With the filter above the containers, you can quickly find your container(s).
Make sure the date range is based on the ETA of the seagoing vessel.
Actions to perform
You can perform a number of actions at container level. Select one or more containers and at the bottom of the screen you will see three buttons with actions:
- Forward: nominate another inland operator
- Cancel forward: withdraw a nomination
- Download: download container data
Forward
- Click the Forward button to nominate an inland operator for handling the transport and the pre-notification.
- Then type the name of the organisation you want to nominate. As you type, the relevant organisations will appear on the screen.
- Select the correct organisation and it is linked immediately.
You have now outsourced the pre-notification and transport of the container to another inland operator. The chosen inland operator is now visible in the container details. The container remains visible to you and you can continue to monitor the container status, planned and actual pick-up times. Only your own status request or pre-notification is cancelled during the transfer.
Cancel Forward
Do you want to withdraw your nomination for one or more containers? After selecting a container, click Cancel Foward. This container will disappear from your overview. You then nominate another inland operator.
Download
Using the Download, button you download an Excel file with data for the selected containers for your own TMS.
Container status
- Rotation level: At rotation level, the number of containers to discharge and/or to load is shown. If there are containers that need attention, a red triangle with an exclamation mark appears, along with the number of containers.
- Visit level: By clicking the visit, the terminal visits within the rotation are shown. At visit level, the number of containers to discharge and/or to load is also shown, with a red triangle with an exclamation mark (and the number of containers) indicating those that need attention. When you open the visit, the containers that require attention are shown at the top of the list by default.
- Container level/handling level: Per container, the statuses below are shown (green = OK, red = action required). Also visible via the Handlings dashboard.
Bringing a container
- Padlock icon = blockage
- Document icon = customs document known at the terminal
- Clock icon = cargo opening started at the terminal
- Key icon = acceptance reference known at the terminal
Collecting a container
- Padlock icon = blockage
- Document icon = customs document known at the terminal
- Square with check mark = container available at the terminal
- Euro icon = commercial release known at the terminal
Railwise
At the request of the Rail Connected programme, Portbase developed a dashboard—called RailWise—that provides insight into the efficiency, capacity and reliability of rail freight transport (containers only). These insights are based on data from HCN Rail and are therefore only available to terminals connected to this service.
How do I get access to RailWise?
In 2025, agreements were made with the participating parties regarding the purchase of the dashboard. If you are not yet using the dashboard but would like to do so for the coming year, please let us know before 16 October by contacting our Sales department.
How do I navigate to RailWise?
You navigate to the dashboard by clicking the RailWise tab at the top of the screen in HCN Rail. The dashboard is available on weekdays from 08:00 to 18:00.
Which metrics does RailWise show?
The dashboard consists of multiple tabs with different metrics; see below.
3.1 Tab KPI’s
This tab shows the metrics below. These metrics are based on the underlying data of the charts on the other tabs. Your KPI’s shows the metrics based on your own data, and Market KPI’s shows the market average for the metrics.
See the example below. The screenshot was taken in week 47. The large numbers show the values for the past week (week 46). The smaller values below show the figures for the week before (week 45). In the background you see a grey chart showing the development of these metrics over the past period.
Example chart number of voyage omits.
- Number of voyage omits
- Average number of handlings per hour
- Average operation time
- Average call size
- Average adjusted call size
3.2 Tab Turnaround port
The metrics on the Turnaround port tab provide insight into how many rotations are still changed/cancelled after the planning has been definitively recorded in the Timetable in HCN (and therefore not at ProRail!) on Thursday at 23:59.
- Percentage of cancelled and changed voyages per week market average
- Number of cancelled and changed voyages per week
3.3 Tab Terminal
The metrics on the Terminal tab provide insight into how efficiently and predictably the operational handling at the terminal takes place.
- Operation time: percentage of visits with deviation (proforma vs actual) incl. market average
- Terminal efficiency: average handlings per hour incl. market average
3.4 Tab Call size
The metrics on the Call size tab provide insight into deviations in the call size.
- Call size: proforma vs replanned vs actual number of equipment
- Number of calls with deviation proforma vs actual
- Number of calls with deviation proforma vs replanned
3.5 Tab definitions
This tab contains definitions and explanations of the metrics, KPI’s and terms used in the dashboard. Consult this tab to interpret the figures correctly.
How can I filter the metrics?
The filter options enable you to search your data in a targeted way. It is possible to apply the filters below within the dashboard. The filters may differ per tab.
- ETA: filter your journeys and visits by a specific time period.
- Rail operator: this filter is only relevant for traction suppliers and terminals and enables them to search specifically for the journeys and visits of one or more specific rail operators. As a traction supplier/terminal, you do not see all journeys and visits of that rail operator per rail operator, but only the journeys and visits operated by you for that rail operator / at your terminal.
- Traction supplier: this filter is only relevant for rail operators and terminals and enables them to search specifically for the journeys and visits of one or more specific traction suppliers. As a rail operator/terminal, you do not see all journeys and visits of that traction supplier per traction supplier, but only the journeys and visits operated by that traction supplier for you / at your terminal.
- Terminal: filter your visits by one or more terminal(s). As a rail operator/traction supplier, you do not see all journeys and visits at that terminal per terminal, but only your own visits at that terminal.
- Shuttle name
- Loading voyage number
- Discharge voyage number
- Deviation: filter by positive/negative deviations.
Which data can I view?
Throughout the dashboard, each organisation only sees its own data and, for some metrics, also the market average. The Port of Rotterdam Authority does have insight into your data, provided you have given permission for this. The Authority will contact you separately about this. For questions about this, you can contact the Port of Rotterdam Authority.
History
Under Rotation, Visit (Train visit) and Handlings (Container), all actions and timestamps can be viewed. A reference of all actions performed and updates. For example, via Rotation, Visit or Handling, click the History tab to see all updates. This gives you insight at all times into all changes that have taken place. Hover your mouse over an update and click the pop-up icon to view your rotation at that point in time.
Report Issue button
Click Report issue to directly inform our Customer Service about your problem while working in HCN Rail.
Part of