In the video, we explain step by step how you can work in Cargo Controller Import. Below the video, the topics and the steps to follow are written out for reference.
Also available in Dutch.
Cargo Controller Import offers two different overviews that allow you to track the current status of a vessel or of your cargo:
- Cargo overview (Cargo)
- Vessel overview (Vessels)
Cargo overview (Cargo)
Track the current status of your cargo. This can be bulk cargo, container cargo or trailer cargo. The status of your cargo includes, among other things: B/Ls, vessel, own reference, terminal, follow-up arrangements and statuses. The cargo screen contains 3 different overviews:
- All cargo: All B/Ls linked by your organisation.
- My cargo: Personal overview of the B/L cargo you want to track. This overview is populated when you mark a B/L as a favourite (star icon).
- My releases: Cargo that you track or that is assigned to you upon receiving the commercial release via the Secure Chain.
Searching with filters
The cargo overview offers various filtering and search options that make it easy to find the B/Ls that are relevant to you or require your attention. Using the selection boxes, you can select multiple B/Ls to quickly and easily perform follow-up actions, such as an NID notification.
Vessel overview (Vessels)
In this overview, track the status of a specific vessel, including ETA/ATA, ETD/ATD, terminal and the linked cargo.
Watch the video below for more information about the vessel overview in Cargo Controller Import.
Also available in Dutch.
Follow-up actions Secure Chain
With Cargo Controller Import, you can easily carry out your follow-up actions in the Secure Chain; everything is integrated within the service. Read all about this in the article How does the Secure Chain work in Cargo Controller Import? In the chapter Monitoring Secure Chain actions, we provide options to quickly get an overview of which cargo is or is not active within the Secure Chain.
Complete cargo information
Within Cargo Controller Import, your organisation can be linked to a B/L in multiple ways. In the article Managing B/Ls in Cargo Controller Import we explain how you can access this data and what options we provide.
Status information in the cargo screen
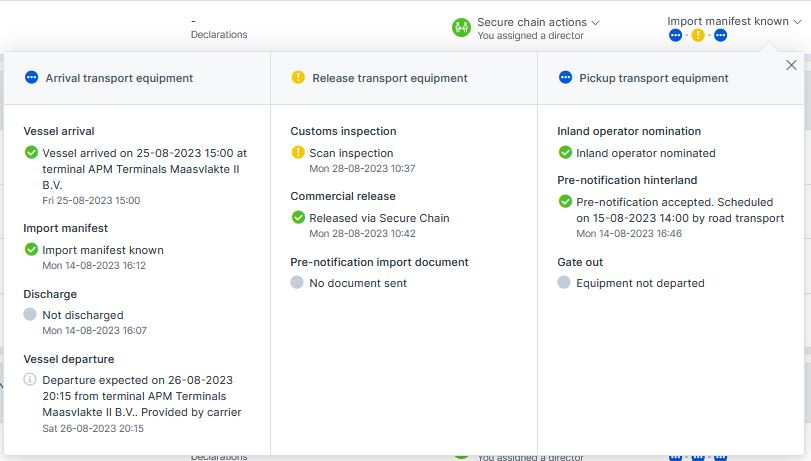
In Cargo Controller Import, you can monitor your cargo in the 3 phases of the import process that the cargo goes through before you can collect it from the terminal. The 3 phases are split into indicators.
When you press the i icon, the detail screen opens with the corresponding indicators. Each indicator monitors the status of the import phase your container is in at that moment. This shows either the overall status or the most critical status. An indicator contains a group of specific indicators for that phase:
Arrival transport equipment
- Vessel arrival status
- Import manifest status
- Discharged at terminal
- Vessel departure status
Release transport equipment
- Customs inspection status
- Commercial release status*
- Import declaration status
Collecting transport equipment
- Inland operator nomination status*
- Pre-notification at terminal status*
- Gate out**
* This indicator is only available within the Secure Chain.
** The availability of the current Gate out status depends on the discharge terminal.
The image below shows how the above is displayed in Cargo Controller Import.
 Meaning of colours and icons
The main indicators show an overall status per phase, or the most critical status. These are the meanings of the colours:
: Status is confirmed, all indicators are green.
: At least 1 indicator is yellow; your attention may be required.
: At least 1 indicator is red; your attention is required.
: Process in progress. Not all indicators are green yet, but there are no warnings either. Waiting for update.
: Status not yet known. No update is available yet; there may be an expected status, such as the ETA. Waiting for update.
The last status is the most interesting: it indicates you are in review of your cargo, but that a status is missing and is still grey. Below you can see a situation in which this can occur:
Tracking cargo and vessels
How you can track cargo and vessels in Cargo Controller Import is explained in detail in the article Tracking cargo and vessels in Cargo Controller Import.
The details of tracked cargo
You can view the details of your cargo by clicking Details for a B/L. Here you will find information about the journey, the B/L and the cargo.
This screen is designed to scroll through; information is shown by opening a container. A timeline is also visible in which you can find the history of the B/L. Here you will find information about who, what and when was involved with the cargo.
Printing the cargo details
In the details screen you will find two different print options:
-
Print
This allows you to create a digital print (PDF) of all information known for the B/L. You can use this information for your own file or share it with your customer. -
Download tracking note
When you have created a Transit Declaration notification. In Cargo Controller Import, you can directly download the tracking note to use during transport or storage in the bonded warehouse.
Viewing details via the timeline
The timeline gives you insight into who, what, and when was involved with the cargo. You can see all changes and important status moments that have been made since the original register of the cargo. This includes, for example, changes to the cargo, the discharge times of cargo, and any Customs inspections. You can also see which colleagues within your organisation have carried out actions on the cargo.
Deleting cargo
Via the details screen, you can also delete a B/L from Cargo Controller Import using the red Delete button. This deletes the B/L for your entire organisation and you will no longer track it. If you want to track the B/L again later, you will need to add it again in Cargo Controller Import.
Receiving and passing on commercial release
How you pass on a release differs depending on the role of the chain party you are going to manage. In the article Receiving commercial release in Cargo Controller Import we explain this process.
Nominating an inland operator and/or authorising a cargo director
Have you received the commercial release and do you want to nominate an inland operator or appoint another cargo director? These steps are explained in the article Nominating an inland operator and/or authorising a cargo director in the Secure Chain.
Carrying out other follow-up actions
Also available in Dutch.
With Cargo Controller Import, you can easily carry out your follow-up actions that you currently do in separate services of Portbase. At this moment, it is possible to create a Transit Declaration and/or a Notification Import Documentation from Cargo Controller Import. You can carry out a follow-up action in three ways:
- Multiple B/Ls via the multi-selection box.
- One B/L via the three-dot button on the B/L row.
- One equipment via the three-dot button at the end of the equipment row. After carrying out this action, you will see the available follow-up actions and make a choice.
Setting up email notifications
This is discussed in the article Setting up email notifications in Cargo Controller Import.
Using labels to group cargo
The video below explains how you can use labels in Cargo Controller Import to group cargo.
Also available in Dutch.
Link with other services
Transit Declaration notification
After you have selected the relevant B/Ls or the equipment, choose Create transit declaration. If you have access to this service, a new form opens in which you select a previously used layout and the timing when you want to submit the declaration: vessel ATA or a specific selected date. You can view, change, add to and submit the details in the template you selected. Using the Save & Send button, you can easily create a draft transit declaration based on all available B/L data from Cargo Controller Import. The declaration is automatically sent at the moment you selected.
Notification Import Documentation (NID)
After you have selected the relevant B/Ls and equipment, choose Notification Import Documentation. If you have access to this service, a new form opens in which you will see the relevant information you need for your notification. At this moment, you only need to choose the terminal, document type, document number and, optionally, the modality. Cargo Controller Import sends the Notification Import Documentation to the terminal you selected after you click Send.
Related articles
- Receiving commercial release in Cargo Controller Import
- Passing on commercial release to (regular) partners in the Secure Chain
- Withdrawing commercial release within the Secure Chain
- No release or authorisation for B/L in the Secure Chain
- I cannot select my logistics partner within the Secure Chain
Related to