
The Arrival Notification Export service is for the following target groups:
You can start the Arrival Notification Export service as follows:
You will first arrive at a dashboard featuring an overview of all arrival notifications created by your organisation. Each line represents one arrival notification. Further details are available under ‘Details’ or ‘Edit’. Here, you will find more information, e.g. status updates and timelines.
In the overview dashboard, you can find various tabs on the left-hand side to improve efficiency and maintain a good overview:
You can search for arrival notifications using the various filters on the left-hand side of the page, on ‘Date range’. You can also filter according to status in the ‘All ’ tab. You can also enter the document number and reference in the search bar during any search.
Alongside each arrival notification, you will see either ‘Edit’ or ‘Details’. Here, you can edit or view the details of the arrival notification. It is only possible to edit unsent or rejected arrival notifications.

Select ‘Details’ in the overview dashboard to view the details of the arrival notification. The ‘Details’ tab contains basic information about the arrival notification. The ‘History’ shows the specific date and time of events.
‘Details’ tab: the ‘Details’ tab includes the details of the arrival notification. This is the information that has been sent to Customs.

‘History’ tab: the ‘History’ tab contains a chronological list of the stages that the arrival notification has gone through. This includes information such as the date and time the arrival notification was created and accepted by Customs, information about any inspections and changes to the arrival notification.

If an arrival notification is yet to be sent or has been rejected following its submission, the overview dashboard will contain an ‘Edit’ button next to the arrival notification.
Clicking on ‘Edit’ in the overview dashboard will open the page below. Here, you will find information such as the document type and number and the reason for the arrival notification’s rejection/failure if applicable.

You can add a new arrival notification by selecting ‘+ New arrival notification’ in the upper right corner of the overview dashboard. This will open a new arrival notification.

You can fill in the following fields:
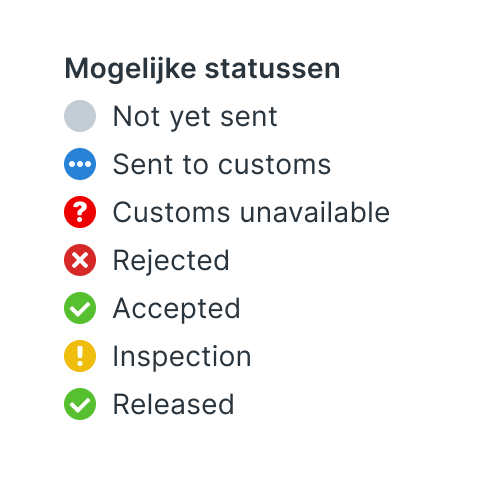
Below, you can view the possible statuses shown on the overview dashboard and an explanation of each individual status.
You can delete an arrival notification if it has not been sent to Customs.

This service includes the option to set email notifications and preferences. For example, you can select a preferred document type and arrival locations.
The settings for email notifications and preferences can be found on the left-hand side of the overview dashboard, under ‘Preferences’.

This page allows you to set email notifications for various events or occurrences. These notifications will be sent to the service user. It is possible to receive email notifications for the following events or occurrences: