
1. How do I manage my B/Ls?
Within Cargo Controller, your organisation can be linked to a B/L and the information that becomes available in multiple ways. In this knowledge article, we explain how you can unlock this data and what possibilities we offer in this.
Option 1: Add a B/L yourself
Each user can enter a B/L number via the web screen (or via Cargo Controller API) in combination with at least 1 container number. Based on this data, Portbase retrieves information submitted by the carrier or cargo broker on the import manifest. If this is known, we immediately show all information (and all containers) that Portbase has available at that moment, an "Extended B/L".
B/Ls that you as a user have added yourself are immediately marked as 'Favorite', recognizable by the yellow star in front of the B/L number. B/Ls that your colleagues have added can also be activated as favorites by clicking on the star.

Option 2: Assigned to a B/L
A carrier, a freight broker or a principal can grant a commercial exemption (via Secure Chain) to your organization without your organization tracking the container on the corresponding B/L within Cargo Controller. Based on this data, Portbase retrieves information that is available within the Secure Chain, a "Basic B/L".

As explained in our Quick Start Guide, there are filter options available, but also 'Quick Views'. These quick views quickly differentiate in the main screen, such as the quick view "My Cargo" which immediately selects all B/Ls that you have registered as favorites.

In addition, you can add a label for each B/L, a reference that makes it unique for your organization. This also allows for additional distinction in B/Ls and you can also apply a filter to the set labels. Click on the Label icon of the B/L and add unique or recurring labels, these are then saved and with the filter 'Labels' you can filter on these values.


Active full insight into cargo information and status
As previously indicated, the way in which your organization is linked to a B/L determines how much information you can see from a B/L. Cargo Controller tracks all B/Ls that are linked to your organization as complete (Extended Tracking) by default. This allows you to see all the important cargo information and status updates that you expect.
Are not all B/Ls actively tracked within your organization and do you need this information? Then every user can easily retrieve this by clicking the 'Get access' button. Portbase then registers a paid transaction and immediately provides all available B/L information as you are used to. The B/L that you manually upgrade is immediately marked as a favorite.

How do I manage my B/Ls for my organization (main administrator)?
The main administrator of an organization can manage the active tracking of B/Ls within Cargo Controller. Click on Manage data access via the User menu:

The 'Manage Authorizations' screen opens, now click on the 'B/L Information' tab:
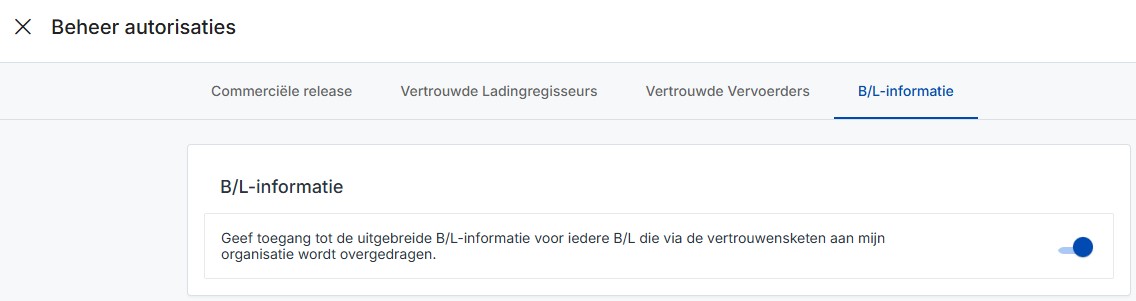
This activates or deactivates the termination of automatic, full B/L information and statuses. By default, this setting is active for your organization. Changes will impact all new B/Ls that are tracked afterwards.
The above can also be controlled via our Cargo Controller API, which allows you to fully integrate with your own internal systems. Read more about this here.
If your organization is not ready for our Cargo Controller API integration, we also have an interim solution with an Excel upload function. Read more about that here.
3. I don’t see any terminal data in my B/Ls, how is that possible?
Additional data sources are available within Cargo Controller that are made available by third parties. So-called add-ons make data available within Cargo Controller under their own conditions. You will mainly find providers of these add-ons in the Portbase Marketplace.
Basics: Carrier data
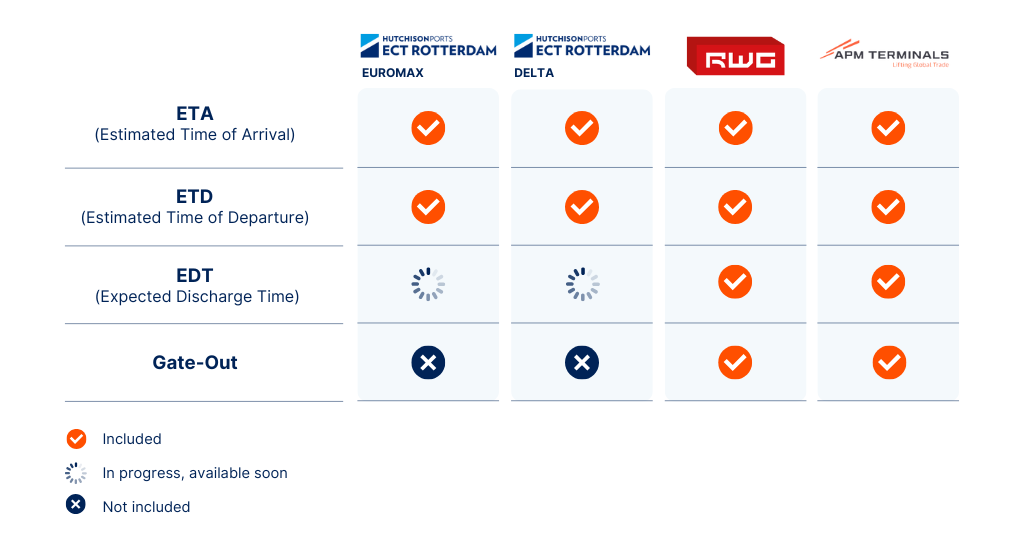
Based on the import manifest, Cargo Controller shows the most current information that the carrier (shipping agent) makes available based on its ship visit to the Dutch port(s). The reliability and accuracy is at most 4 days before the planned ETA. To improve the basics, the terminal data is considerably more reliable, sometimes up to 14 days before the planned ETA. Cargo Controller provides the carrier data by default, unless other sources are available and your organization meets the conditions. You can read more about these conditions at the bottom of this page.
Am I looking at terminal data or carrier data?
The status screen of Cargo Controller clearly indicates whether the data was supplied by the carrier or by the terminal. The example below shows data from the carrier:

The conditions under which you see data may differ per terminal. Below is an example of the APM Terminals that makes its terminal data available free of charge to all Cargo Controller users:

The conditions that a terminal sets can also result in your organization not seeing any data until these conditions are met. See below an example of an organization that did not have a ECT MyTerminal Free account and therefore did not receive a release confirmation in Cargo Controller:

Premium Terminal Data in Cargo Controller
* All Terminals reserve the right to make changes to their terms and conditions.
Those involved will be informed in a timely manner of any changes to the conditions.
The benefits of Premium Terminal Data
How to access Premium Terminal Data
To receive terminal data as a shipper or freight forwarder, you need a Cargo Controller subscription in Portbase. There are 2 options:
Via web: For Cargo Controller web users, the status screen in Cargo Controller clearly indicates whether the data was provided by the shipping line or the terminal.
Via API: Terminal data is also directly available through our Cargo Controller API. This allows you to use the API as a single source instead of setting up multiple separate connections. For more detailed information, see our API specifications on our Developer Portal.
Different procedures apply per terminal. Read more below.
APMT
APMT automatically provides terminal data within Cargo Controller. No additional action is required; this service is completely free of charge.APMT reserves the right to make changes to the terms and conditions. Stakeholders will be informed of any changes in a timely manner.
Price: No subscription fee and/or transaction fee.
RWG
RWG Premium Terminal Data must be requested within the Cargo Controller service. Only users with the role 'Main Administrator' or 'Data Managers' can request this premium service)
Price: Based on a subscription and transaction fee per B/L. Find more here. Login to PCS is requiered.
ECT
To receive terminal data from ECT, you need to have both a Cargo Contoller account from Portbase and a MyTerminal+ account from ECT. Data authorisations for ECT have to be requested through MyTerminal. More information here.
Price: Based on ECT Myterminal account. Find out more here.
2. How do I track the status of my cargo?
After adding your cargo you will discover the power of Cargo Controller, you are now able to monitor all your cargo based on 3 main indicators. These 3 main indicators represent the 3 phases of the import process that your cargo goes through before you can have it picked up at the terminal. These 3 main indicators are also called 'gates' and our status messages 'milestones'. In this article we explain the statuses, but also how you can apply them to simplify your daily work by working based on exceptions (management by exceptions).

Import phases
Each indicator monitors the status of the import phase your container is currently in. This way, either the general status or the most critical status is shown. An indicator contains a group of specific indicators for that phase:
* This indicator is only available within the Secure Chain. More information about this can be found in our Quick Start Guide, Factsheet or introduction film.
** This indicator is only available if the terminal makes this data available. Would you like to know more about terminal data within Cargo Controller? Then read more here first.
Legend of the status indicator
As you can see, the 3 indicators are based on 10 individual indicators. You can view this if you press the i icon and open the details screen:

Colors and icons
The main indicator will provide you with the overall status of the phase, or the most urgent one within that phase. Their color and icon will read as the following:
In de onderstaande stappen gaan we in op hoe je deze statussen kan monitoren via filters e/o e-mailnotificaties aan de hand van een aantal voorbeelden.
Monitoring statuses
In our Quick Start Guide we have already mentioned the filter options within Cargo Controller, in this part we explain a number of them to use to filter out important status updates. This in combination with a number of our supporting email notifications.

Filter 1: Import manifest
Check 'Data not available', all B/Ls that are not known are now shown in the overview. Without a manifest, Cargo Controller cannot share any other status with you. The shipping company is responsible for submitting the import manifest. They must confirm this to the Harbor Master 4 days before ETA.
Tip 1: Always check first that there is no typo in the registered B/L number, that is our number 1 cause for questions in this situation.
Tip 2: Sometimes a B/L may have been wrongly registered on the manifest and subsequently deleted. An email notification is also available for this situation (B/L removed).
Filter 2: Discharge
Check 'Not Discharged' and containers have not yet been confirmed by the terminal. This can arise from various situations, such as a communication disruption between the terminal and Portbase, a cut-and-run situation by the shipping company or your organization at this terminal is not allowed to view this data (see Terminal data).
Tip: An e-mail notification is available that sends an e-mail when the ship has departed, but the discharge confirmation has not yet been received.
Filter 3: Inspection status
Check 'Notified', all containers that Customs has selected for inspection, 'have fallen red', are now shown on the screen.
Or: Check 'Released' to select all containers that were inspected and have now been released by Customs.
Tip: There are e-mail notifications available that send an email when the container has been notified and subsequently released.
Filter 4: Import document
Check 'Unknown', all containers for which no import document (MID) has yet been submitted to the terminal are now shown on the screen.
Tip: An e-mail notification is available that sends an e-mail if no MID has been submitted 6 hours after unloading the container.
Filter 5: Inland operator
Check 'Not nominated', all containers for which no carrier has yet been nominated (Secure Chain action) are now shown on the screen.
You can now track the status of your cargo
Based on this article, you can now easily navigate through the statuses of the cargo and you are in control of the current status. The next steps if a status deviates differ per situation. Read more here how you can set up email notifications.