
Why can’t I download my manifest?
Only manifests with the status ‘Accepted’ can be downloaded, as the Excel file can also serve as alternative proof of exit to Customs.
How can I delete a manifest?
If the manifest has not yet been sent, the manifest can be deleted under 'Edit'.
Manifests that have been accepted by Customs cannot be deleted. In this situation, remove all documents from the manifest and send the empty manifest.
Why doesn’t my manifest show up in the ‘Urgent’ tab?
Manifests are visible in the 'Urgent' tab if a manifest has not been accepted by Customs and the ship has sailed.
How is it determined whether a manifest is automatically prepared?
In the service Vessel Notification, it checked whether you are the cargo handling agent and purpose of visit is ‘Loading’.
Follow the tour: A lifebuoy for new users
Cargo Release Manager has a lifeline for new users. Through various tours, new users can quickly become familiar with our service and the functionalities available.
The Secure Chain tour becomes active immediately upon logging in for the first time. You can decide to skip this and activate it at a later time of your choosing. At this moment the tours are only available in English.

The Secure Chain tour walks through the operation of the overview screen and the available notification options.
Going through a tour again?

New user? This lifebuoy is for you!
Cargo Controller has a lifeline for new users. From a central checklist, new users can quickly become familiar with our service and the functionalities available via various tours.
The checklist becomes active immediately upon logging in for the first time. You can decide to skip this, or take one of the several tours and activate the checklist again at a later time of your choosing. At the moment the tours are only available in English.

These tours go through the basic steps of how to get started with Cargo Controller. After you have completed a tour, we also keep track of it and it is no longer actively offered. This way of providing in-service support is continuously updated based on Customer Service questions that users ask.
Going through a tour again?

We hope that you, as a new user, will quickly get to know the basic functionalities of Cargo Controller.
How do I convert part of an import B/L to transhipment, na ATA?
How do I convert part of a transhipment B/L to Import, na ATA?
How do I convert an import B/L to a transhipment B/L?
Note: in this scenario the container number is required as an extra check!
How do I convert a transhipment B/L to an import B/L?
Overlanded: My container(s) were discharged at another terminal then declared in MLI (Cargo Declaration Import), what do I do?
Overlanded: My container(s) were discharged at another terminal then declared in MLI (Cargo Declaration Import), what do I do?
Can I download B/L data to process into my own systems?
Yes. In Cargo Controller you can very easily download an overview of all B/Ls that you currently have visible in your overview screen. This depends on the filters you have active.

Download selection
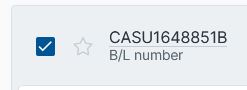
Based on your filters, you can choose to download all B/Ls or a number of specific B/Ls. Click on the 'checkbox' at the top of the overview screen to select all B/Ls for download at once.
Or select the desired B/Ls at B/L level by selecting the 'checkbox' per B/L.
Download
After you have selected at least 1 B/L, additional action buttons will become visible at the top of the overview screen. In the example below, all visible B/Ls are selected. You will see the 'Download' button almost on the left.
![]()
You will receive confirmation via a pop-up message of how many B/Ls have been selected for the download and you can confirm the download. A CSV file will then follow with the requested data.

How can I activate Secure Chain within Cargo Controller?
If you are already using Cargo Controller, you can have the following activated by your organization's main administrator. For Cargo Controller API users, the steps below are also necessary to complete before you can use our extensive API functions.
Master administrators have access to the PCS-menu option 'Organization management':

In this menu, the main user can issue rights to users by means of User groups. Go to the User Groups tab.
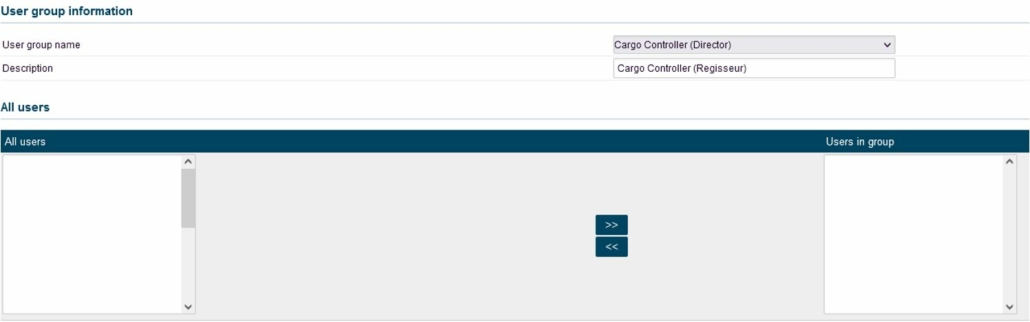
We have added a User Group 'Cargo Controller (Director)' for all existing Cargo Controller users. Click on this title and you can then add colleagues to this group. Click on 'Save' to apply the changes.
A colleague who is already logged in will then have to log out and log in before the extra functionalities are visible in his Cargo Controller environment.
Tip: In this way, we hope that you limit the management of these functionalities to the users who actually use them in their work.
How can I remove a incorrect B/L from my overview?
It sometimes happens that a B/L number changes after it has been split by the shipping company or that you have made a typing error. In both cases it is desirable to remove erroneous B/Ls in order to maintain an accurate overview.
You can select B/Ls via the checkbox for the B/L number and then click the 'Delete' button.

Another confirmation prompt will follow for you to confirm.

Can I download data to process in my own systems?
As with uploading CVEDs, you can also easily download updates about these CVEDs and the current status of the inspection. The download concerns an Excel that you can then process in your own systems.
The process in this is very simple, you click on the 'Download' button next to the search field at the top of the overview screen. You will immediately receive a download of all visible inspections from your overview.

Selection dates
You can limit the download by pre-filtering the overview screen with all the filter options on the left. Your download then only concerns data that you currently see in the overview screen.
How do I know if something has changed in my inspection request?
An inspection station may decide to change your inspection for various reasons. This may mean that your application is rejected or that a period has expired. You can set up an e-mail notification for this.
You can set up e-mail notifications for the most important status changes. This allows you to easily stay informed of important status changes:

By default, e-mail notifications are sent to the e-mail address of your PCS account. You can submit a different e-mail address via the ‘edit’ button.
Can I upload my CVEDs via Excel?
You can easily upload your CVEDs in bulk via our Excel template. In this way you can easily and efficiently process data from your own system in PCS.
Download Excel template
In the inspection overview screen, click on the button 'Request inspection' at the top right and the input screen will appear. At the bottom of the screen, click on the 'Upload CVED(s)' button.

A small screen pops up where you can download the template.

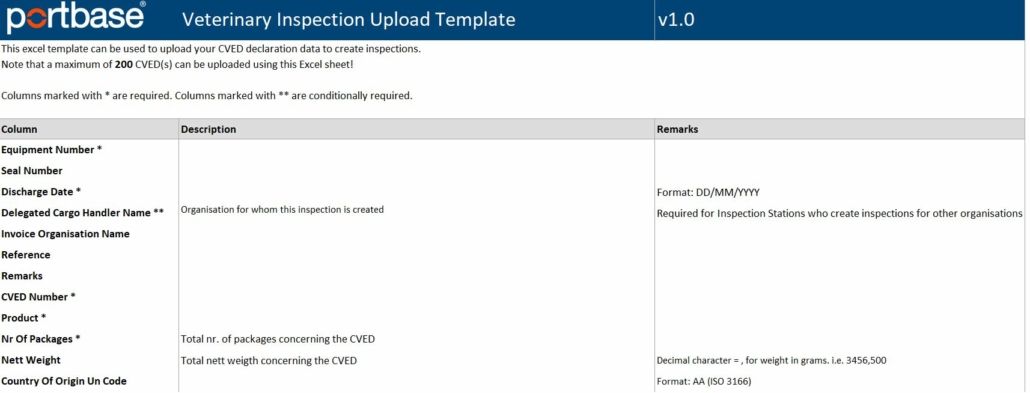
Fill Excel template
The template contains 2 tabs, where the first tab must be kept and provides you with an explanation of which value should be entered in which column in the second tab. You can then enter these values in the second tab. Save this file, with both tabs, and you can now read in these GGBs in bulk.
Upload Excel template
You can now upload the completed Excel template in the screen via the 'select' link or by dragging the file into the gray area. The 'Upload' button will then become active.

Excel template processed
If no errors have been made in the template, it will be processed and you will see the following confirmation on the screen.

The CVEDs are now visible in the inspection overview and ready for further processing.
Support
If your template could not be processed, you will receive a red error message and an explanation. Change the data and/or the template based on this explanation and try again. If you still can't process your file you can always contact Customer Service for support.
When will I receive my approval from the Netherlands Food and Consumer Product Authority (NVWA)?
If your inspection has been completed, you will see this in the 'Completed' status in the VIP overview screen.

You can find out the course of the inspection in the timeline:

Through the NVWA, your inspection report is issued in our service Declaration Food & Consumer Products. See this relevant Declaration Food & Consumer Products knowledge article for more information.
How can I see that a CVED has been refused by the NVWA?
If the NVWA has refused your CVED declaration, this will be shown in the VIP overview as follows:
![]()

You cannot submit an inspection request at this time and your inspection has been canceled immediately. You can also view these events in the timeline via 'Details':

You will have to check and resubmit your CVED declaration to request an inspection.
Is my shipment known at the terminal?
If the status under 'Booking' is green, there is a terminal that expects the shipment.
Why is the ETA/ETD information not available?
The ship's ETA/ETD becomes known when Portbase receives the loading list from the shipping company/shipbroker. The time of receipt of the loading list may differ per shipping company. It is possible that the loading list is known a week in advance, but this can also be on the day of departure. Which ETA/ETD information is shown comes from the shipping company.
No information from the pre-announcement is visible after I have added the booking number manually, I see a gray dot – Why is this?
The pre-notification has not yet been made in the 'Notification Export Documentation' service. The pre-notification might be made later. The equipment is currently not admitted to the terminal if it requires pre-notification. See here the overview of terminals that require pre-notification via Portbase. If you expected that the pre-notification has been made already, please contact the party responsible.
How do I see that the pre-notification of the booking has been made?
If the status under 'Document' is green, the pre-notification has been made. Hover over the "i" in the main screen for the booking for which you want to know whether the pre-notification has been made.
Yellow at “Booking” indicates that the pre-notification has been made, there is not yet a terminal that has indicated it wishes to receive the pre-notification. If green, the pre-notification has been sent to a terminal.
What is the difference between a yellow and green dot as status under ‘Booking’?
Yellow at 'Booking' indicates that the pre-notification has been made, there is not yet a terminal that has indicated it wishes to receive the pre-notification. If green, the pre-notification has been sent to a terminal.
I can’t find the booking in my overview – Why is this?
The main screen only shows bookings for which your company has made the pre-announcement itself. There is the option to add other bookings manually.
Select '+ Add' at the top right of the main screen. In the screen that opens you can add the booking number you want to track.
Why has no Confirmation of Exit been sent yet?
After the vessel has departed, the shipping company/shipbroker must submit the manifest within 1 working day. After this, the Confirmation of Exit is sent. Hover over the “i” in the main screen to check which phase the shipment is in.
What does ‘Automatic released’ mean under Customs Inspection?
When all the equipments of the document/MRN have arrived at the terminal, Portbase will report the arrival to Customs. Customs only sends a message back if the document is rejected or an inspection is announced. Portbase automatically releases the shipment after 5 minutes. An inspection can always be announced until the moment the ship departs. In addition, there are a number of document types that do not require an arrival notification to Customs, such as ICT and TT1. These are immediately set to automatic released.
Why do I see ‘Booking known by terminal’ several times in the timeline?
If multiple equipments are part of the booking, for each equipment you can see that the booking for that specific document/MRN is known.
Is it possible to amend the terminal before arrival?
If the status is already set to “Accepted”, it can no longer be changed. The document must first be deactivated by Customs. You can do this by sending a "Cancel Request" in the notification. This is then sent to Customs.
Can existing “Guarantees” be removed?
It is not possible to delete the existing “Guarantees”. These always remain listed in the overview. You can however specify an end date via (Valid to).
Is it possible to adjust the “Terminal of Discharge” in the declaration?
There are two options:
Can old “Guarantees” be deleted?
It is not possible to delete old "guarantees", the reason behind this is unknown.
Is it possible to remove/deactivate the containers that are “In Transit” via Portbase?
Only Customs has the option to deactivate these.
When Customs has disabled them, the status will switch to “Completed”. You next need to draw up a blank declaration, because it is not possible to reuse it.
Why do documents remain listed under “Cancellation Request Rejected” while they are being used and have been cleared/released with the status “Completed”?
When Customs has processed your cancellation request, it is manually converted by Customs.
The process takes longer because Customs does the processing manually. Once Customs has processed your request, it will be listed as cancelled for you.
What do I have to fill in at “Authorised Location”?
Notification in “Accepted”, but it still needs to be released, will that be done automatically?
A simplified procedure (SP) will be in “Accepted” for a brief moment and will then immediately move to “In transit”. In the case of a standard procedure, it will only change to transit when the container passes Customs at the outgoing port- as soon as Customs prints a T1 document.
Please note! This must be included in the licence.
What to do if the B/L for which a transit declaration has been drawn up is removed from ATO/SAL?
When a shipment is listed in the Declaration for Temporary Storage (ATO in Dutch), an "obligation" to clear it is created in the customs systems.
The NCTS system of the Netherlands has a thrice daily delivery to the obligation system to report which B/Ls are stated in a transit declaration and to subsequently clear them.
This does not apply the other way around. When a B/L is removed from the ATO, the obligation (whether completed or not) will be removed from the commitment system. The transit system does not receive any notification of this.
If the transit declaration in question consequently needs to be closed or cancelled, the customer who has prepared this transit declaration must submit a cancellation request. This can be done digitally or via the Clearance office in Heerlen.
What is a T2 declaration and what is it used for?
T2 is a transit declaration and must be drawn up when cargo for example transits to Italy through Switzerland. The T2 document is deregistered in NCTS at the Italian border, after which it can continue.
For groupage shipments/trailers, one consignee and one consignor are used. Declarations can never have multiple recipients. The various consignments in the groupage trailer are indicated in the BIS list after the declaration. The addressed party in the declaration is usually the customs office of deregistration.
Status “SF” – A sequence of more than one item is not allowed as the first argument of local
Your T1 declaration has been rejected with the message:
DataDirectXQueryXPTY0004A sequence of more than one item is not allowed as the first argument of local:checkDataField() ("6646", "6646") caused by: DataDirectXQueryXPTY0004A sequence of more than one item is not allowed as the first argument of local:checkDataField () ("6646", "6646") caused by: A sequence of more than one item is not allowed as the first argument of local:checkDataField() ("6646", "6646")
The same guarantee type and reference have been used twice under the “guarantees”. This may only be used once within the "guarantees". Portbase can adjust the status so that you can amend the declaration.
When does the triangle icon next to the Customs process disappear?
It often happens that a transport document is drawn up while this does not make sense according to the information in the summary declaration (Declaration for Temporary Storage, ATO). This causes mismatches. To avoid mismatches, screen S141 shows the customs process indicated on the ATO. If the customs process in the ATO has a value other than empty, a transport document is not required. The triangle is a warning for you as the customer.
You have the following options:
Can I change the terminal of discharge?
It is not possible to adjust this afterwards in the service. You can create a notification for this in the service Notification Import Documentation. In this, you as it were register the document for the relevant terminal.
How can I submit transit declarations under the simplified procedure?
We are a new customer of Portbase and we want to submit transit declarations under the simplified procedure. However, it turns out that we still have to report to the regional coordinator so that we can register presentation locations in the KIS system as well.
What else do we need to do to be able to work under the simplified procedure in the Netherlands?
You want to submit under the simplified procedure (authorised consignor transit). A customer registered abroad (BE) is involved here. For this, you only need to submit the normal procedure.
The status is set to “Information requested”. What do I need to do?
If the transit period has expired, you will receive a request “Inquiry non-terminated transport” (enquiry notice) from Customs after seven days. This is indicated by means of the status “Information requested”.
When you click on the line, you will see the details of transport. You need to respond to Customs via the button “Enquiry details”.
There is a “Cancellation Request” for document declaration in “In Transit”, what does that mean?
The document needs to be cancelled, but there is no cancellation request. The status of the transit declaration is now “In Transit”?
This can no longer be cancelled in Portbase because the status is “In Transit”. You need to contact Customs “Transit” for this.
Is it possible to expand the licence so that we work under a simplified procedure?
The licence “Allowed consignor Transit” is only for companies that import the administration in the Netherlands.
Can a new declaration with the same container be made after a cancellation?
Check whether the declaration has actually been cancelled, or whether it is listed in the declaration with the status “Cancelled” or “Closed with exception”. If the declaration has the status “Cancelled”, you can change the status to “Acknowledged” so that the container is moved to the status "Closed with exception" and a new declaration can be created via “New declaration” for the container used. You can also find this with the B/L number at “Manifest container”.
Explanation document type for a preceding document in Portbase
IM declaration for placing non-commercial goods under customs registration:
How can I request my deposit in the service Transit Declaration?
Once the deposit has been sent, you can click on the envelope icon next to “Action”. You can now request the deposit.
Please note - this can be done for a maximum of 5 times a day.
The status on “ST” can cause confusion, but it was sent to Customs during the process. If you want certainty, please contact the office on +31 88 151 09 87.
What happens if I specify a different customs office of destination in my response message (IE141) than the one listed in my original declaration?
If this is the case, the customs authorities will initiate a so-called follow-up enquiry and will consult the relevant customs office specified in the IE141 message. The question that is being asked is sent in an IE142 message. The customs office has a maximum period of 214 days to respond.
Can I reuse the rejected declaration?
You can use the "re-use" button. The same declaration will then be prepared for you again. You only need to amend the improvements. This function is not available if the declaration was cancelled by the customer themselves.
What do I have to specify for “terminal or discharge” within transit?
Specify the terminal of discharge of the sea-going vessel. This field is optional, but if the relevant terminal is known, the "loading place" and "presentation location" will be derived from here and an MRN notification can be sent to the connected terminal.
Documents that have been drawn up are listed under “insufficient guarantee”. They have actually been deducted from the deposit, so why is this happening?
We do not have access to the amount of the deposit you have with Customs. We advise you to contact the Transit department of the Customs Office on +31 88 151 09 87. They can inform you about declarations that have not yet been debited.
Reuse for the declaration at the terminals, are there extra costs involved?
If a company uses the Portbase service Transit Declaration for its customs declarations in NCTS, the data entered can also be reused for the declaration to the terminals. No additional charges are involved.
What does the status “closed with exception” mean?
If you cancel a notification, the status will first change to “cancel requested” and, if the request from Customs is accepted, subsequently to “cancelled”.
If a notification is listed as cancelled, it must be acknowledged in order to be able to generate a new declaration. By acknowledging – confirming the cancellation - the status is changed to “closed with exception”.
If you cancel a notification, the status will first change to “cancel requested” and, if Customs accepts the request, subsequently to “cancelled”.
Instructions for filling in MoT type (Means of Transport)
Below “Transport details”, you are required to fill in the details of the means of transport by which the container will depart the terminal and, if applicable, the means of transport by which the container will exit the Netherlands.
Despite the many options that are possible, in practice, the choice is limited to road transport, rail transport and inland barge transport. To make the “Transport details” easy to fill in, you can use the chart below to enter the data.
| Mode of transport | MoT Type | MoT nationality | MoT ID* |
| Road transport | 31X | Enter the country code of the means of transport here. | Enter an identification of the means of transport here. |
| Rail transport | 210X | Do not enter anything here for Rail transport | Enter an identification of the means of transport here. |
| Inland water transport | 850X | Enter the country code of the means of transport here. | Enter an identification of the means of transport here. |
*To successfully dispatch the message and operationally process it, the MoT ID must be specified. However, this is often not known in practice. Usually, a period (.) or the text “unknown” suffices.
Declaration has been scheduled for inspection; how should I proceed?
This means that Customs intends to carry out an inspection prior to departure. Customs will normally contact you within two hours. If this is not the case, you can inquire with the office of departure, NL000510. You can do so by calling +31 181 373 737 with the question whether the inspection still needs to be performed or, if not, whether permission to depart can be granted.
What can be the reason to receive a rejection?
You have forgotten to fill in the details on the screen below. It is not possible to restore this via Portbase. You need to contact the relevant terminal to do this.
DataDirectXQueryErrorError Modality can contain the value
Current: caused by: DataDirectXQueryErrorError Modality can contain the value
Current: caused by: Error Modality can contain the value
Can the notification “Declaration updated by Customs” be turned off?
This notification cannot be turned off, this is a mandatory notification from Customs.
Is it possible to amend the mode of transport afterwards in Transit Declaration?
It is not possible to amend the mode of transport afterwards. The best way to do this is to contact the National Helpdesk Dutch Customs, NCTS department.
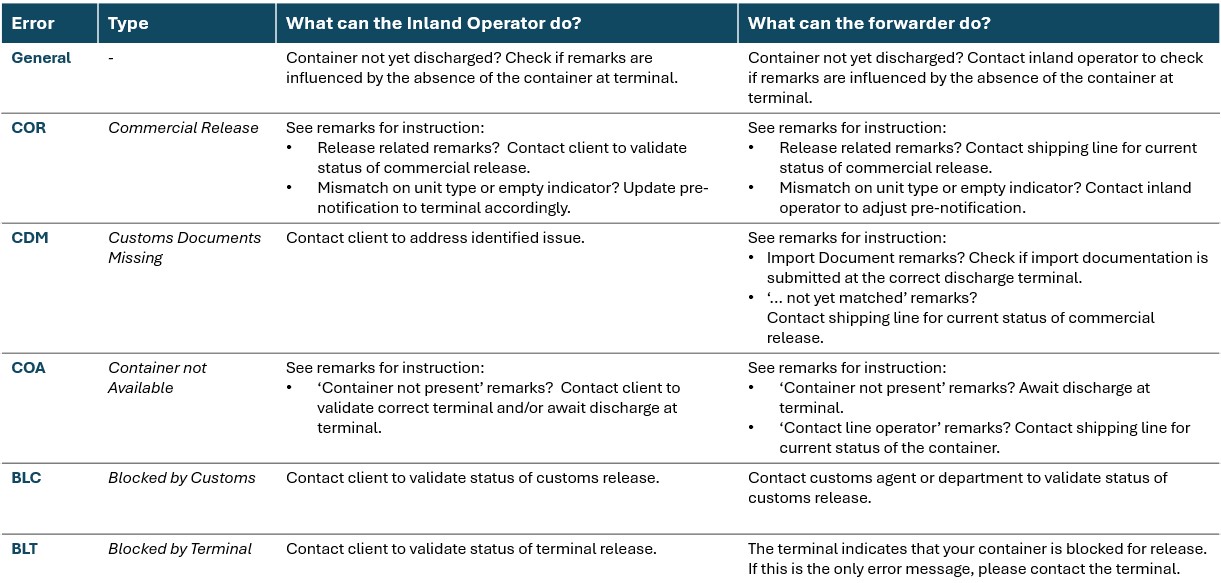
My inland operator’s terminal status is different, what can I do?
The new status 'Pre-notification Hinterland' in Cargo Controller shows the terminal pick-up status that the inland operator sees after pre-notifying at the terminal. Provided that your organisation participates in the Secure Chain.
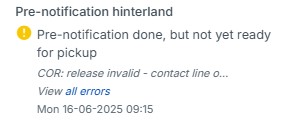
I see an error code, what can I do?
The text above will give many questions, which can often be self-evident for a carrier. Use each other's expertise to determine whose turn it is to change the status and release the cargo for collection. Below is a general checklist of what you or your carrier can do to improve the terminal status.
Please note! Each terminal has its own unique list of error messages and text field entries. The terminal can provide an explanation in the description of the error code. The status of the pre-notification comes from the terminal, this is the direct status from the terminal system. The status shown is a snapshot and is not automatically updated by all terminals. Always check the date and time of the status to see if it is up to date.
What is Discharge Information?
With Discharge information, the terminal feeds back the actual unloaded weight to the manifest. This update is shared with all parties in the chain and port involved in the unloading process. The stowage data specified can also be reused one-on-one in the Hazardous Goods Notification to the Harbor Master.
Discharge Information is available in Dutch and English. To adjust your preference, see manual 'Setting up e-mail notifications and screen language'.
What are the syntax requirements for an import document?
Portbase validates the correctnes of documentnumbers based on a set of criteria.
Especially customs-documents (transitdocuments and import documents) have strict requirements.
| Documenttype | ||||||
| MRN | NT1 | IM4 | IM7 | PIE | Overige documenttypes | |
| Validation | ||||||
| Is the customer authorised for notifications with the terminal? | X | X | X | X | X | X |
| Documentnumber is max 35 characters long | X | |||||
| Documentnumber is 18 characters long | X | X | X | X | X | |
| Documentnumber contains correct checkdigit | X | X | X | X | X | |
| Documentnumber contains countrycode NL (character 3 + 4) | X | X | X | X | X | X |
| Documentnumber starts with correct year (current year or year -1) |
X | X | X | X | X | |
| Documentnumber contains the according customs office number of departure for this terminal* | X | X | ||||
| Documentnumber does not contain a customs office number | X | X | X | |||
| Documentnumber is not an export document from the UK | X | X | also applies to documenttype 'FWV' |
|||
* Please find an overview of the valid customs officenumber for each terminal
Example: "21NL00051015132BD2" is a transit document in the simplified procedure for a terminal located at the Maasvlakte (e.g. APM terminals)
|
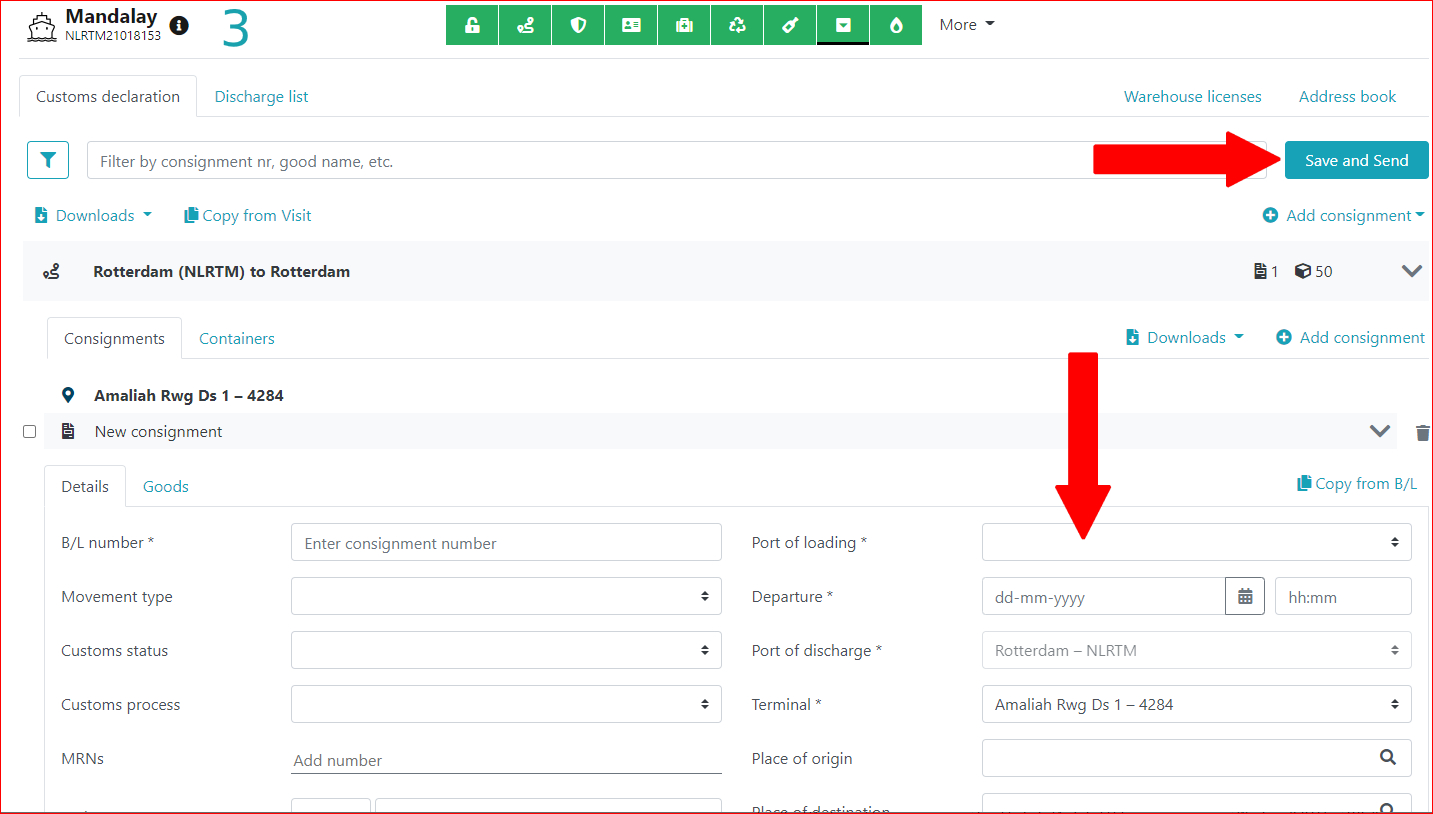
Adding overlanded containers to a manifest (with port of loading selection) in 3 steps.
1 - Select all (or part) and click Add to manifest
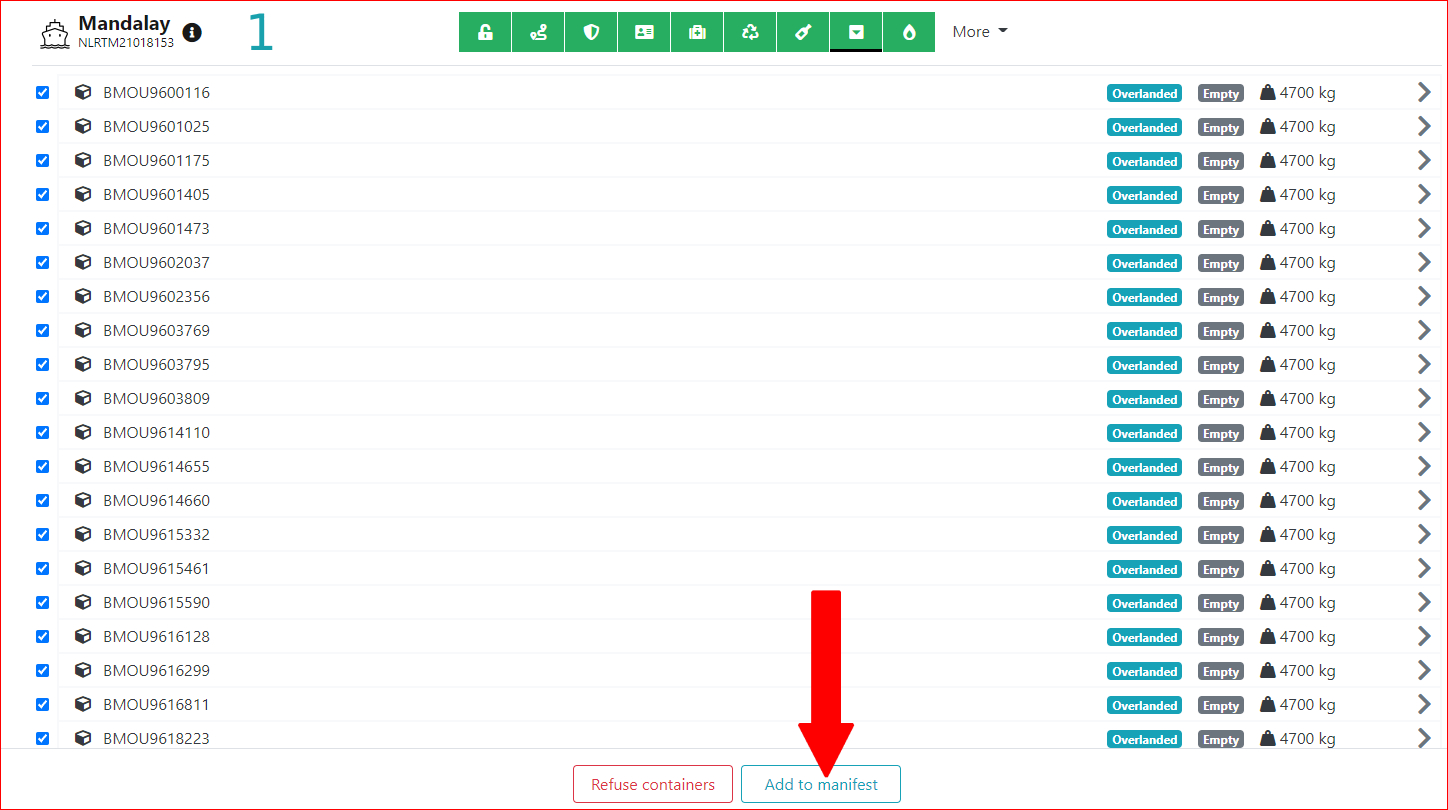
2 - The overlandeds are now out of the picture and must be added to a consignment => click on Add consignment.
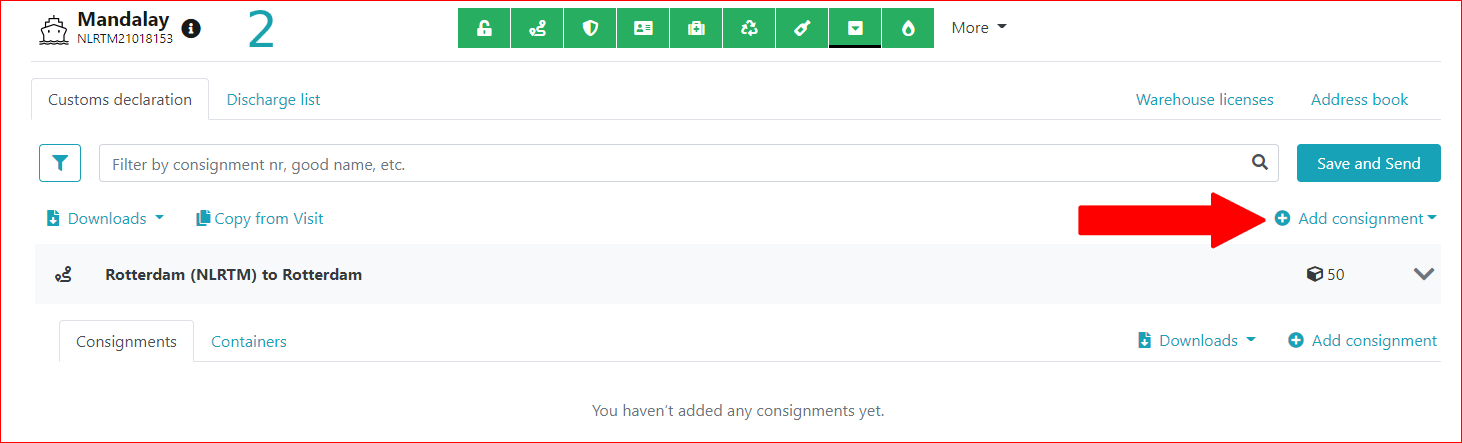
=> consignment entry screen opens.
3 - Fill in all necessary and desired details (e.g. choose a port of loading) and click on Save en Send.
How do you switch to a different Internet browser?
Switch to Firefox
Mozilla Firefox is available for almost every platform you can think of: Windows, Mac, Linux, Android and iOS. You can download the browser from Mozilla's website and then follow the instructions to install it.
When you start Firefox for the first time, it will ask you if you want to import data from another browser. This will allow you to download favourites and bookmarks from almost any other browser. From Chrome and Internet Explorer, you can also bring cookies, history, and saved passwords.
Switching to Chrome
Google Chrome is available for the same platforms as Firefox: Windows, Mac, Linux, Android (where it is often the default browser) and iOS. You can download the browser from Google's website and then follow the instructions to install it.
When you first start Chrome, you'll be asked if you want to transfer data from another browser. From Firefox, you can take favourites, history, saved passwords, search engine preferences and form data. Internet Explorer allows you to transfer favourites, history and saved passwords, and Edge and Safari only allow you to transfer favourites.
Switching to Edge
Switching to Microsoft Edge is easiest if you already use Internet Explorer, Microsoft's previous and now obsolete browser. You can take almost all data with you. You do this by clicking on the menu button at the top right and then on 'Settings'. Then select "import and export". Now you can select which browser you want to import data from.
Note: For Chrome, you can take along favourites, history, cookies, passwords and settings. Firefox only has favourites.
How can I set up e-mail notifications?
Read how to set up e-mail notifications in our instruction manual.
In case you have e-mail notifications configured in Cargo Information, please reconfigure the notifications in Cargo Controller.
The (old) notification settings in cargo information can then be deleted.
Which terminals’ status data can I track?
An overview of our affiliated terminals can be found here.
Which type of cargo can I track with Cargo Controller?
Cargo Controller is suitable for containers, trailers (accompanied/unaccompanied) and other equipments
| Equipment type | Method of linking in the service Cargo Controller |
| Containers | Container number + B/L number |
| Trailers | Unaccompanied transport Trailer number + shipment number
For example, cargo via CLDN: Accompanied transport: For example, cargo via Stena Line: |
| Other equipments | Equipment number as specified by the shipping company |
What are the technical requirements for using the Cargo Controller web screens?
Cargo Controller works with Google Chrome, Microsoft Edge and Mozilla Firefox. Proper functioning of Cargo Controller cannot be guaranteed when using other browsers, such as Internet Explorer.
How can I add one or more users?
Users are automatically added to the PCS the first time they log in using IAMconnected. As the administrator, you then grant access to the appropriate services in User Management. Check out the steps for adding or changing user groups in PCS here.
Can I download data to process in my own systems?
As with uploading CVEDs, you can also easily download updates about these CVEDs and the current status of the inspection. The download concerns an Excel that you can then process in your own systems.
The process in this is very simple, you click on the 'Download' button next to the search field at the top of the overview screen. You will immediately receive a download of all visible inspections from your overview.
Selection dates
You can limit the download by pre-filtering the overview screen with all the filter options on the left. Your download then only concerns data that you currently see in the overview screen.